0 Comments
We drove over to fiesta island and go ready to launch our rocket, when we launched our rocket it went up to 219 feet in the air and I believe that it did really good considering how heavy it was. One thing that didn't work was the ejection charge so my rockets capsule didn't go and the parachute didn't deploy so that was a bummer but overall like liked the rocket my group and I made and I also had a fun semester. Below is the video of our launch. When we were finished making our rocket we had to test to see if our rocket was able to with stand a flight so we had to tie a long line of fishing line on the center of gravity and spin around in a circle and go fast and slow. We need to see if our rocket would stay straight or if it would wiggle around all the tests we have done it was really straight and stable and now its ready for the launch day.
So for the nose cone we used a PVC pipe plug to but we also made a capsule that would hold a quail egg. Natalie was making a cage inside the capsule that would had hold the egg but since the capsule was smaller than she expected it didn't work out so well but it was cool because she used very small copper wire and soldered them to make a little cage for the egg. Zion and I made the capsule by using un-needed parts of a rocket body and putting the one PVC pipe plug on one end of the capsule and the other one on the other side. we also painted the capsule black and Zion and I tried to make decal designs on it too we were thinking of putting fire designs on it, we were able to make the flames but we weren't able to spry paint it.
Ok first thing first my group forgot to take pictures of our process on assembling the rocket since most of the work we had to do took two people to do.
so Zion and I used super glue to construct our rocket so like the fins, the launch lug, and the motor holder and it was really easy to do but after we put everything together Zion and I forgot to do one thing before anything else and that was the math for the fins and where to place them on the rocket. So we had to find out the surface area of our rocket and the first step was to find the center of gravity on the rocket since we already put the fins on the rocket it was a little messed up but we proceeded on to do the math. So to find the center of gravity you get two fingers on the ends of the rocket then slowly move then closer and closer until they are together and that's the center of gravity on the rocket. The next step is to measure the lower and upper parts of the rocket were the center of gravity is. I found out that the lower part of the rocket was 25.5125(it was lower than the upper part of the rocket) and that the top part of the rocket was 40.231 and then we had to find the difference of each of them and that was 14.7185. We found out all of this by using the Diameter of the rocket multiplied by pie and I got 3.925 then I multiply that by the surface area of the upper and lower parts of the rocket which was 6.5 for the lower and 10.25 for the upper. Sadly my group forgot to take pictures of the finished rocket. Once our plans were approved by everyone in the group we moved on to make the body of the rocket. The first step was to get poster paper and cut it into even strips, the thicker the strip is the longer the rocket is so my group cut the paper about 2 inches in width. The next thing was to get a PVC pipe and wrap one strip around the PVC pipe in a spiral motion taping both ends onto the PVC pipe, after that you get another strip and put wood glue on it and then wrap it around the first one evenly because if its not even the body is pron to get wrinkly and make the rocket look bad. Once the second layer is finished you repeat the process about 1-2 times more than lay it out to dry it may take around 1 day to dry. Once we let the body dry we started to make the fins, the materials we used to make the fins was balsa wood because one we thought it was easy to cut and it was stiff enough to make a goo fin. So what we did was that we made a stencil of a fin design we wanted then we drew it on the balsa wood and cut it out using exacto knifes. Since the body was dry we decided to paint our rocket so I came with the idea of we should spray paint the rocket so Zion and I went around the school trying to find spry paint. Before spry painting Zion and I had to find the materials that was necessary to keep us safe and to not damage school property we had to get a tarp, painting masks, gloves, goggles, and a box to spray paint in. we eventually found spry paint but we wanted to put some cool designs on our rocket so we came up with this. We first used red spray paint for the body once the paint dried we used masking tape and covered most of the red and then we stared to spry paint the body with a metallic blue. We waited for the blue dry before taking off the tape which create the blue lines. We also decided to paint the fins a gray to make the rocket pop out a bit more. So since Zion, Natalie and I made a rocket motor together we had to stay in the same group to make a working rocket to launch on the launch day. So we started to plan what we wanted to do and this is what we came up with. We decided that we wanted to make another compartment or capsule to keep a egg inside while we launch the rocket, we also decided to make our rocket 18 inches the body will be 14 inches and the capsule will be 4 inches, the fins will also be 4 inches.  In this project I was partnered up with Zion, Alex, and Natalie and in this section the whole class was going to pair up and make a engine. The first thing my group research is what we wanted to burn and how to burn it. The first thing I researched is what we wanted to burn and we were told that we could either pick black powder or potassium Nitrate with sugar. Black powder
Then After we looked out the fuel we had to look up what type of core we wanted. The cores we could is a core burner or end burner.
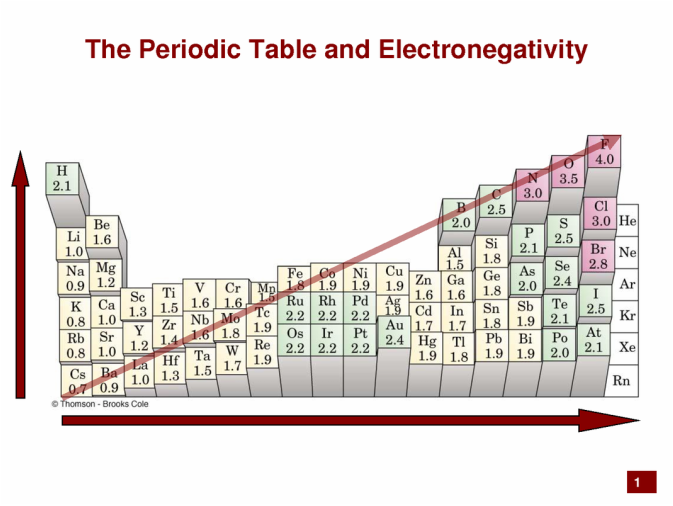
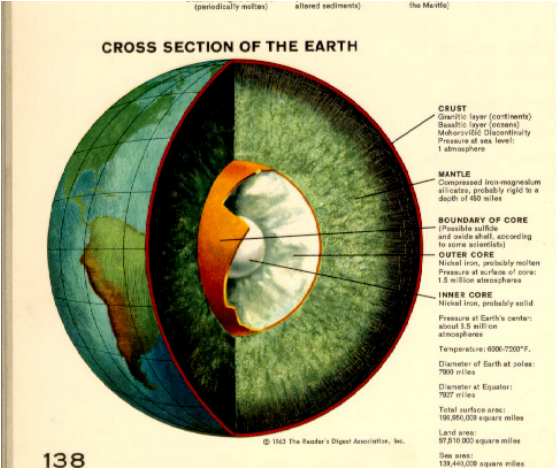
After we figured out what type of burner we wanted we had to draw the whole thing out but right now I don't have the picture of it because Alex left and he has the drawing of out motor. Our motor was a potassium Nitrate with with sugar KNO3 and red iron oxide ( to increase the burn rate), the burner was a end burner and the nozzle is cored 1/4in and size. After that we gave the drawing to Andrew to get it approved and once approved he makes our motor. Everyone in the class got there motor so we all went out to the field at NTC to test our design. Here's our outcome in the video below. Once we we tested the motors we have to do the math behind the whole project and had to graph our thrust curve using the video below going 30 frames per seconds. Here's our thrust curve paper. Andrew sent out a spreed sheet where we could be able to calculate the total thrust, the burnout time, and the average thrust of the whole motor. The total thrust for out rocket produced is 3104 in grams (which is really bad compared to the other motors), the burnout time was 6 sec, and our average thrust in grams is 17.34. If we had to pick a motor out of everybody I would say that I would pick Philippe and Gabe's motor (like everyone else) because it produced the most thrust out of everyone which was 48,472 grams of thrust and it would be 15 times stronger than my rocket that only produced 3014 grams of thrust. We will be using the motors designs for the final section. Reflection: Looking Back I felt like our motor would have been better if we got to make multiple motors but I also felt like our rocket performed ok for our first test. Looking Beyond Our motor was I would say the slowest rocket and it also took a long time for the motor to finish. Looking Inwards I think that our rocket would have been better if was a black powder rocket because the sugar rockets were just slow compared to black powder rocket. In our motor if we added more red iron oxide I think that it would have burn faster thus making the thrust more. Looking Outwards I think my partners was good but it was very unexpected when Alex left to join the other team and so since our group doesn't have the diagram we couldn't put it up on our blog. Yes I had good partners but next time I'm most likely going to pair up with someone else because there wasn't as much communication within the group besides me and Zion. Looking Forwards I would say that if I were to do this project again I would create more motors so I can pick which one performed better because our motor was really bad in my opinion like yes it worked but it looks like it wouldn't even get off the ground with the amount of thrust it produced. Takeaways I really like this project so far because not only we are learning about rocket science we are also learning about combustion, elements, compounds, and etc. I also learned how to make thrust curves and to estimate how high the rocket would go. I can't wit till the next section.   silicates:Is a combination of silicon and oxygen 95% of earth's crust, and 97% of earth's mantle is made of silicates. On the earth there's a lot of silicon. The theory is that the core if filled with a big thing of iron the mantle is filled with silicon and oxygen silicate=SiO3-2 Na=Sodium Co=Cobalt Ci=Chlorine 1.Core: Made of solid Iron and Nickel 2.Outer Core: Made of liquid Iron and Nickel 3.Mantle: Made of molten rocks(Silicate) 4.Crust: Outer,Solidified Mantle Questions Why Did we do this lab/ Purpose?? The purpose of this lab is to understand the planet we live on and what it's made of, like the inside of the planet like the core, outer core, mantle and crust. Why study earth science?? Well in my opinion its important because we live on earth so its good to know what your living on and I think that if we learn more about the earth we can help it more rather that polluting our planet or find out ways to help make it cleaner. What info did we need to know when we did this lab? In this lab we needed to know what our planet is made of, how chemicals react with each other like the more farther away the element is on the periodic table the more the elements want to be together also known as electronegativity , and the materials which is Distilled Water,Cement Floor sealer,Calcium Chloride, Cobalt silicate, Copper sulfate, gloves, 3 beakers, beaker racks, and a straw to help scoop in the elements. What was your observation?? So on the first picture below shows the crystals forming from the calcium chloride, cobalt silicate, and copper sulfate. When Andrew first put them in it took some time for it to form but the calcium chloride was faster than all of the other ones. Both the cobalt and copper took a long time and for some reason they both climbed up the the beaker and it looked cool. Explain your observation looking beyond In this guided activity I was with Lupe, Garret, and Noah. As a group I feel like we all did good, even though there wasn't much to do we all documented what happened. If I could do this again I would ask if we can choose more compounds to see there reactions and maybe even mixing them together to make something cool. 
 When Kobe and I was doing the Bismuth lab we encountered a problem and the problem was that the hot plates wasn't working for some odd reason. We needed the hot plate to help melt the bismuth to make bismuth crystals. We took the hot plate to Andrew and told him the that the hot plates wasn't working anymore, Andrew said that's odd and checked to see if the hot plate was in fact not working. To his surprise it wasn't working so I asked Andrew if we can take it apart to check if we can fix it and he said that we can. I took apart the hot plates with Andrew and we tried to find what was going on with the hot plates we checked everywhere inside the hot plates and at one point we both thought that this hot plate was unfix able until we found the fuse. The Fuse is a thin wire that if there's too much current going through it then its design to break (Its a safety feature). So the fuse broke and we had to replace it and thank god that we can fix the hot plate because now its used a lot around the class. I also learned something and its that when you go and test any electrical use only two fingers and make an arc with it (use your index and thumb) because While trying to find the problem of the hot plates we found the fuse and both of us being unaware, Andrew didn't put his other hand away from any metal on the hot plate and he got shocked but Andrew said that it went through his body because his other hand was on the hot plate and that its really dangerous. I would have to say that the hardest part was to just find the problem because in the hot plate a lot of stuff can be the cause of the problem. The easiest part was replacing the fuse its self because all we needed to do is take out the fuse and put in a new one. 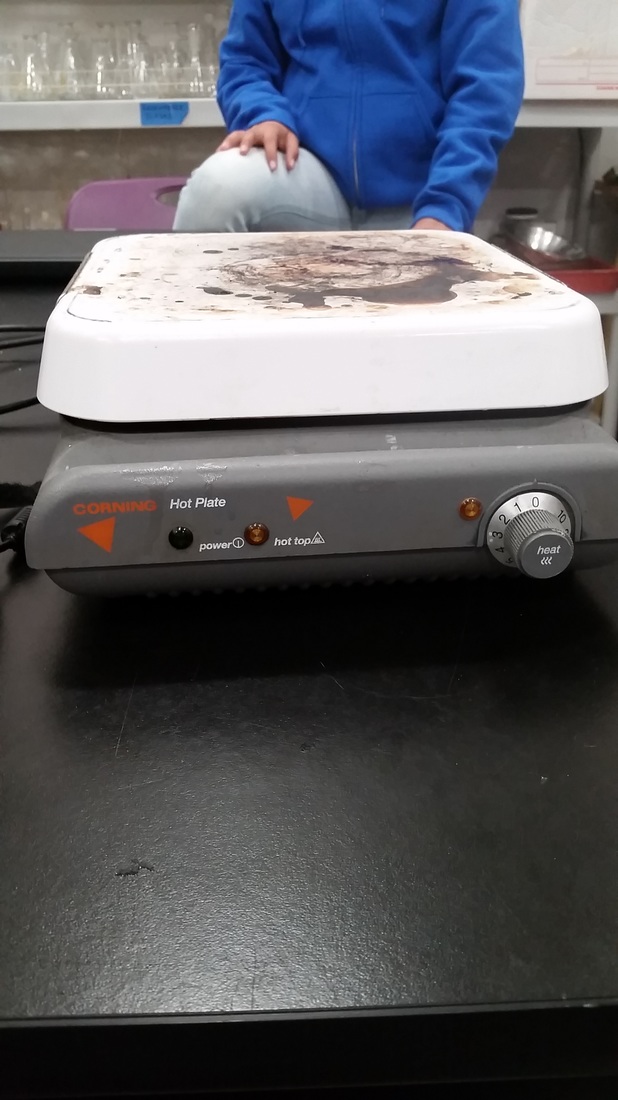 |
AuthorWrite something about yourself. No need to be fancy, just an overview. Archives
December 2015
Categories |


 RSS Feed
